While this will probably only be interesting to anyone who is actively searching for “How to Clean a Rapidograph Pen” or “Can you save a Rapidograph Pen with dried ink in it?” – I feel compelled to create this post because if you are one of these sad and frustrated people, there’s not a lot on the net that really goes into how to rescue so-called irreparable Rapidograph Pens.
So, before you stop reading because this is of no interest to you – at least know this – Rapidograph pens are expensive but exquisite. They’re a pain in the ass to most because they are not the typical “one-use” experience most people are used to. They’re worth it though…. hence why I just spent 4 hours reviving 3 “dead” pens.
If you just want to find some basic information about normal cleaning (video) or a copy of the instruction sheet that came with the pens just click on the links. I would also advise picking up a copy of “The Technical Pen” by Gary Simmons if you’re serious about pen care because he’s got an excellent “manual” of sorts in the front of this book.
So – those of you who are searching for the following information – you’re probably thinking “Well, but just how dead is dead?” and “Can I really save my pen?“.
Short answer: I left a 0x3/.25 Koh-I-Noor Rapidograph with ink in it (absolutely no cleaning what-so-ever AND a bent freaking cleansing wire – yep, that’s right – BENT WIRE!) alone for 8+ years and my 0/.35 and 2/.60 pens with a “half-ass” external and ink-cartridge cleaning for 5+ years. And yes, there is a chance to save them. So if you’ve just picked up some pens on eBay that were not as great as thought or you’ve been squirreling away your shame for the past 8 years like me – there’s hope.
I’m not making promises and I take no responsibility for anything you encounter BUT – the following details my process of saving (yes, SAVING) all three of my pens and if there was hope for my incredibly abused pens there might be for yours too… and what have you really got to lose?
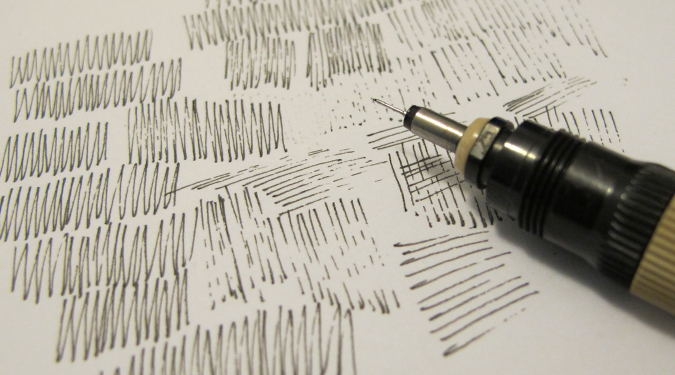
Long Answer (with Pictures!)
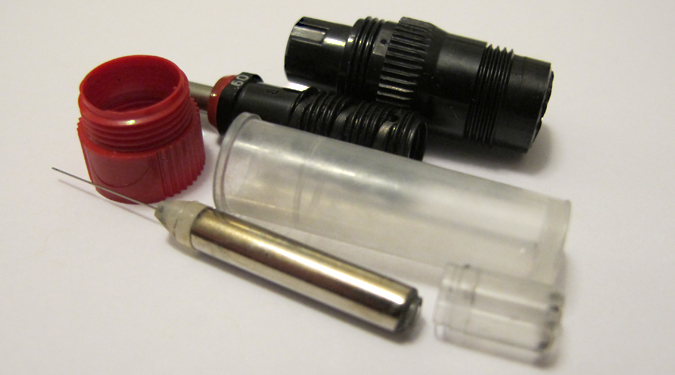
What you need to clean Koh-I-Noor Rapidograph Pens:
- The Koh-I-Noor Syringe Cleaner Kit with Point Starter and Nib Key (between $10-15 alone w/out Rapido-Eze cleaner)
- Rapido-eze cleaner OR Isopropyl Alcohol (91% or higher) – I used the alcohol throughout all of this. Also – do NOT use nail-polish remover – you WILL ruin your pens if you do.
- Small Container (preferrably with lid) if only using alcohol
- Q-Tips… lots and lots of them…
- Rubber Gloves
- Tweasers
- Paper Towels
- Patience

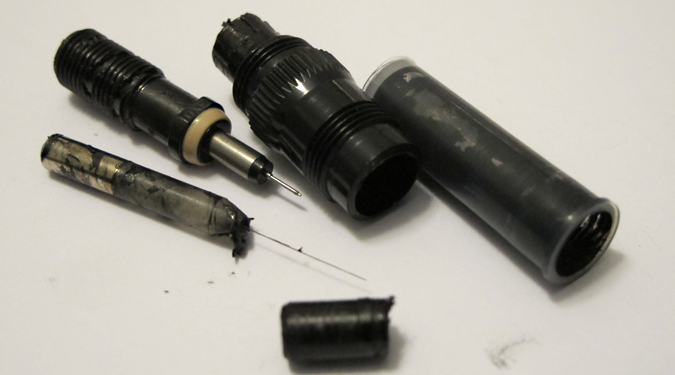
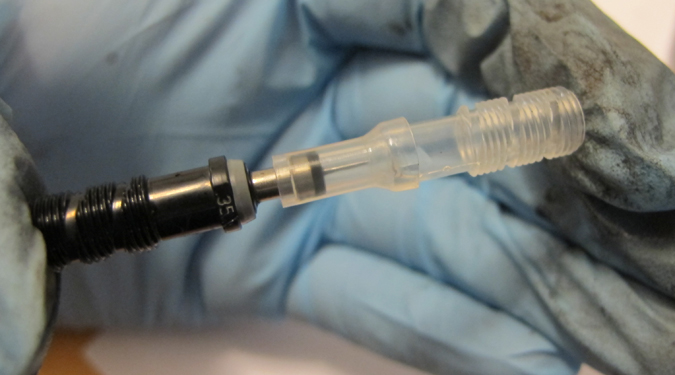
First things first – take your pen apart.

Even if you think the ink is completely dried up it will still have some life in it – mine did even after 8 years of dry-time. Put the gloves on before you ever go in and you’ll thank me. Make sure that you have all of the above parts separated if you’re trying to salvage a dead or really bad pen.
You do NOT need to go into all of this if you’re just trying to maintain an already good pen (see the links provided above and run… run away while you still can!).
So – what will you probably find?
Here’s what I found:


I would recommend only doing one pen at a time (as I did) so that you don’t confuse parts or risk to many fragile parts colliding or getting damaged. It’s easier to keep all the parts straight at this point too – you’ll become VERY familiar with the way you pen works by the end of all of this though.
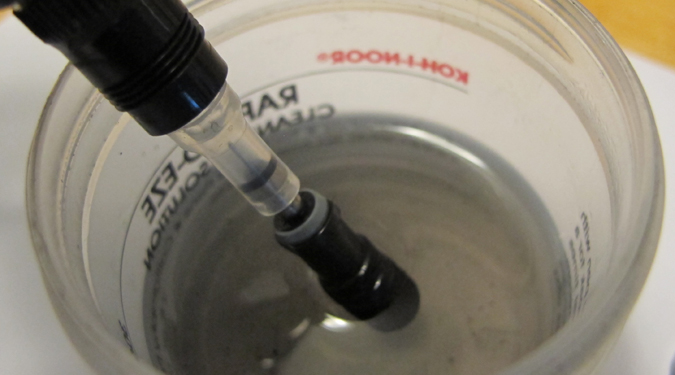
I used alcohol during all of this – not Rapido-eze. I save the more pricey Rapido-eze for maintenance cleaning.
Once you get the parts all good to go, dump them in the container of alcohol (I used an old Rapido-Eze container least there be any confusion) and let them soak a bit. You can take one part out at a time to scour gently with q-tips.


At this point you’re probably going to feel like you want to poke yourself in the eye because you’ve been cleaning forever and still have traces (or gobs) of ink coming off every time you swab or soak the parts. Keep going – it’s worth it!
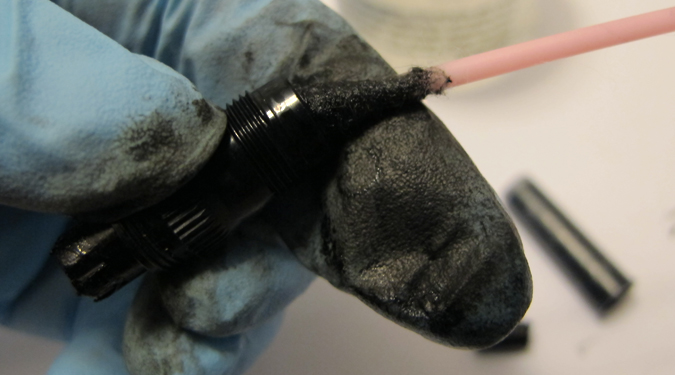
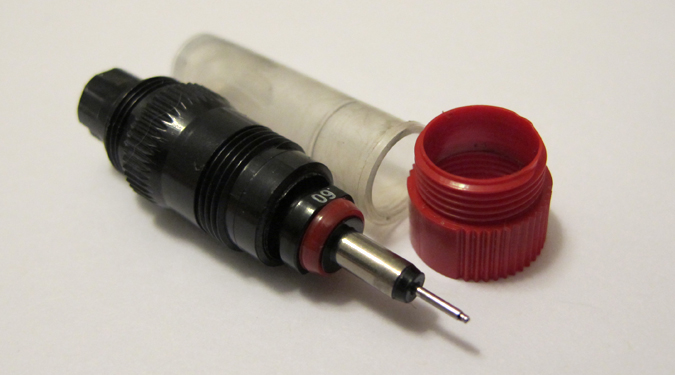
Once you’re pretty good on the basic cleaning level of all the parts you can try to unclog the pin tip – this is really important because if you don’t do this before you try to put the cleansing wire back in you’re going to bend the wire.
I know, because this is exactly what I did with my 3×0/.25 pen. I straightened the little bugger as best I could and tried to stave off the exhausted tears that threatened to overtake me but now I will NEVER not clean this part before reassembly again. Lesson learned.
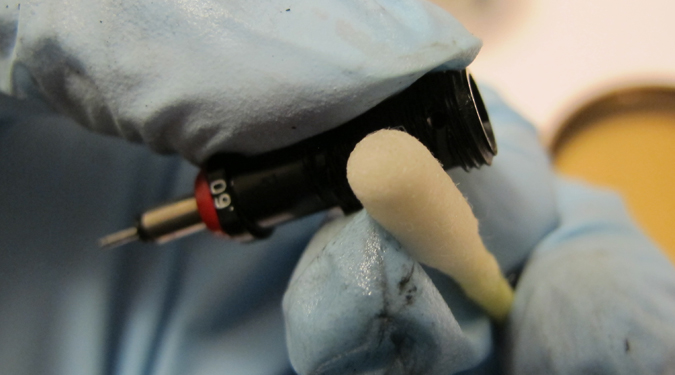
So… you can use the Syringe Cleaner and Point Starter now with more clear results. If you did it when there was still so much ink coating everything you wouldn’t know if it was actually clean or not.
The Syringe Cleaner has a special adapter that allows you to screw in the pen body to the bulb – normally you’d use this with the whole little nib assembled to clean your pen between fill ups (see the you tube video link at beginning of post). If you want to clean your pin point as suggested by me BEFORE you put the whole thing back together you’ll need to use the Point Starter that comes with the kit. It’s a bit backward so here’s how it works:


Note: The end of the weight on the cleansing wire will stick out the end of the pen point barrel – you can actually look at the point. Despite using the Point Starter adapter you’ll still probably see a bit of ink come out that was pushed by the wire.
Reinserting the cleaning wire is what got me my first time but after that it wasn’t hard and I didn’t damage the wire. I even kept working on my 0x3 in spite of slightly bending it’s wire because I didn’t think I had anything to lose at that point. I simply used my nail against my gloved finger to coax it back to “straight” and then went from there. I have read that it is easy to pull this wire out or break it off so be careful!
Once you get the Nib reassembled, I’d recommend using the Syringe the usual way (sans Point Starter adapter) to make sure the whole thing is super clean. For this part – I really do recommend the youtube video by Dick Blick if you haven’t already watched it.
So, now the tricky part – getting the pens filled and started. I would recommend following the instructions on the linked instruction sheet for this part.
When I started my pens, the 2/.60 (red) pen started fairly quickly. I was thrilled. It seems to almost let too much ink out but I feel like I remember it doing this before – it’s a large pen tip. It doesn’t skip now and doesn’t send out a blob of ink though at all. No leaking ink either. It’s great! What a relief!

The 0/.35 (grey) pen started after a few seconds of mark making but was spotty. I realized that I needed a bit more ink. It stopped working entirely for a bit there but then I realized that the ink-refill had created a bubble cap. A few brisk taps with the butt of the pen to the table cleared this up and it started to flow much more reliably.

The 0x3/.25 (tan) pen was another story altogether. It was the first pen I worked with throughout all of this – and was the least hopeful of the three. It refused to work the first time at all. I took it apart (cleaned it again) and worked more on the pen point but was afraid that the bent wire was the real issue. I tried to make sure the wire and pen point were clean but did not use the pen starter yet (not sure why this didn’t dawn on me). … nothing… I tried using the Syringe normally… nothing…
And, when I was trying to get it started I gave it a good downward shake that was forceful (but not hard) and ink came out of the nib in unexpected places. This was online advice… I didn’t find it helpful…

I finally re-soaked the heck out of every part for about 20 minutes and (finally) used the Point Starter. I noticed an almost immediate difference in the flow of alcohol out of the tip with the Point Starter and sure enough – this time when I refilled the dang thing it worked. It skipped a bunch at first but finally started and has been going fine since.
And there you have it…. three 8 year old disasters saved with 4 hours of elbow grease, the Koh-I-Noor Syringe kit, about 100 q-tips, and 8+ ounces of rubbing alcohol.

And now to draw… Squee!!!

THANK YOU FOR THIS SET OF INSTRUCTIONS!!! You helped me save two pens, and I can now sell the whole set! 🙂
So glad it worked! My pens haven’t given me any trouble since I cleaned them out and I haven’t had to clean them again since I’ve just refilled and went with it each time but I don’t let more than 4-5 days go by without using all of them. Hope they don’t give you any more trouble. 🙂
I haven’t tried this yet but I’m thanking you in advance! Once my cleaning kit arrives, I’m going to get to work salvaging my 20+ year-old pens. Thanks again!
Hope they turn out well! Good luck. 🙂
Thanks so much! My pens are working great now!
That’s good news – glad my walk-through helped. 🙂
I just got 8 pens for about three dollars at a fantastic estate sale. 3 of them are blocked with dried ink. The other 5 have never been used! I appreciate your instructions! I had a couple Rapidographs back in the day but I had forgotten how to clean them. Thanks so much! And, great photos!
That’s an awesome find! Enjoy. 🙂
Thank You!!! I have a set of Staedler Mars pens that have den in my closet for 30 years. Going to give it a go!
Hope the instructions helped. 🙂
no alcohol…only used water (my well water)…soak overnight…change water to “see” …not adverse to using lips to blow ink out of nib and other parts…paper towels…mess easy to wash away…when inserting needle slowly rotate weight-end and it will slide in quick as Bob’s your uncle…slow stroke to push old ink out.
my 3×0/.25 had been sadly dormant a VERY long time
Great photos…great text…
THX
Glad this stuff helped. 🙂
Te amo, de verdaaaad. En mi país no se consiguen estos rapidografs desde hace veinte años… pensé que había perdido mi 0.1 mm.
Thank you for writing such a detailed step by step cleaning procedure. I got an eight pen set as a gift from my ex-mother in law from the time that she went to school. (I’m sure more than 20 years ago) and I was able to clean them well. however, I used alcohol to soak them first for a couple of hours before opening them and later with the help of some delicate pliers I opened them and washed the inside pieces with water and liquid dish-washing soap. I used a soft sponge on the plastic outer parts and a pipe cleaner for the inside. the pipe cleaner is better than the Q-tips because it is a thin wire covered with thin soft material like a brush. After that I just left them soaking again in alcohol for a few more hours. I don’t own a syringe cleaner. For now, I cleaned them up to this point and tomorrow I will buy the syringe to finish cleaning them. Unfortunately, before finding your page I started using “Goo Gone” and I ruined one of my pens. It melted the plastic 😦
But thanks to you I saved the rest oft hem.
Oh goodness! That sucks about the Goo Gone – that’s crazy! I’ve read that using detergents are also bad because of their chemicals and such but then we use them to clean plastic things that we eat on so I’m not exactly sure what the chemical danger is there – I say if it works, it works – when the alternative is to lose the pen entirely sometimes it’s worth it just to try, even if the attempt is unsuccessful. I’m glad that the other pens worked out.
So hoping this works.. I haven’t used my pens since 2001, and I’m hoping I can save them with some TLC and skills I learned from cleaning weapons after BRM. I don’t want to buy a new set, when I have a clogged set sitting right here.. and since I have a line drawing that desperately needs inking I can’t wait for my pens to work again…
I hope these instructions helped – I had absolutely no previous experience so I’m sure you got them cleaned up. Happy drawing.
I picked up a 7 pen set (missing the .5 of course) at a yard sale for $4. A quick run about google and the post came to the top of my radar as the most useful. I was able to get all 6 of the pens flowing using the steps you have listed here. The one thing that I did not expect was for the printing on the barrel of the pen to wipe off (they were quite messy with dried ink) when I cleaned them. It doesn’t affect the operation so it’s not critical. The trick of rotating as inserting worked great. Thanks for the great post.
Later,
1PM
So glad it worked and what a steal! I was shocked when a magic eraser completely cleaned the logo off of the barrel of mine – melamine can be a menace! 🙂 Enjoy the pens.
Where can I purchase a cleansing wire for the nibs
I’m not sure what a cleansing wire is – I didn’t use one but I think it’s a great idea. The wire that is part of the pen itself is so fragile that a sturdier one to help clean out the gunk would be so helpful. If I ever see one I’ll post another reply.
This just saved my 20 year old set from high school. THANK YOU!
I just now unearthed a set I bought over 30 years ago. Five of the eight are in need of cleaning. I used soap and water on the cartridges and that worked. After soaking them, I used q-tips to clean the residual bits and they are good as new. I’m so grateful to you for posting this and I will get to the rest of the cleanup very soon – I have a big pen & ink project ahead so am excited to get started. I don’t have the syringe – do you know where I can get one? Or do you think that blowing into the nibs works as well? Thank you so much for all the wonderful information. I’ll let you know how they turn out!
So glad I could help! My advice regarding the syringe is to buy one online – you’ll probably save about $10. Try Cheap Joes or Jerry’s Artarama maybe (if you’re in the states). Best to you. 🙂
Thanks, Megan. I was ready to chuck the pen after having gotten another new point gunked up, but I followed your instructions and now the pen works great!
Yay! Happy to hear the outcome was sunny. Take care.
Hi, thanks so much for this tutorial! I only have 1 of these pens that I rarely use but I didn’t want ot have to trash it OR spend the same amount of $$ on a cleaning kit when I could replace the single pen for about the same cost. Buying a cleaning kit makes total sense if you have a full set of these pens. For me, not so much.
so I came up with a solution based on your example. I have a 2 year old kid and happened to have one of those snot sucking bulbs the hospital sends home with you for stuffy baby noses. I realized that suction device in the kit looks very similar. So I got the suction bulb out of storage and snipped a little bit off the tip to make the hole large enough to cram the pen tip into – MAGIC – it worked! with that, some rubbing alc, and q-tips my pen is clean and working perfectly. no special kit required! oh, and I also had to use a straight pin to get down inside the tiniest part of the pen tip to break away the last bit of dried ink but other than that it was totally easy.
in case anyone is wondering what on earth I’m talking about here’s an image of the nose bulb – http://www.nosesucker.com/wp-content/uploads/2009/09/nose-sucker-bulb-top-left-pointing-down.bmp
Necessity is truly the mother of invention! What a creative solution. 🙂 thank you for sharing this information as I’m sure others will greatly benefit from a more DIY option.
So satisfying to get a clogged pen running again! Thank you!
Good deal! Just doing my part to save the world, one tech pen at a time. 😉
I am so excited that I found this! Today at a thrift store I found a perfect vintage set of these pens for $3, and I was ecstatic! I’ve been wanting a technical pen, and now I have seven! But I got home and tried cleaning them all afternoon, to no avail. They are very dried up and full of old ink residue, but this blog post gives me hope! I will buy a syringe and some alcohol and let you know what happens. Thanks so much for being detailed, I’m so glad this blog post exists.
$3 for 7 pens is such a steal! Congrats on a great find. 🙂 I really hope that the syringe helps. While I would not soak in alcohol for a long period of time, you might dump the pen parts into some hot soapy water and leave for 24 hours or something and see if that helps? My dad recently gave me some vintage pens (with plastic bodies that started to dissolve in alcohol) and that was the only thing that broke through the crud.
Thanks Megan – and others who added helpful tips. I just picked up a set at a garage sale for $1 (CDN!) and I feel pretty confident I’ll be able to get them working again using your instructions. Even though I didn’t pay much I would have felt badly throwing out some great pens instead of giving them a second life.
Hope you were able to get them clean and running well. The next best feeling to actually using a tech pen is knowing that you saved it from a landfill to boot. 😉
I forgot earlier to get on here to tell you how grateful I am for your instructions. I was able to get all but one pen clean – and when I have the time, I will work on that one again. It has allowed me to continue with my pen and ink projects and I am so pleased. I thank you over and over when I am using these wonderful pens.
That’s great news! 🙂 And, thank you so much. It’s great to hear everyone’s success stories.
Hi Megan, One point of warning: I soaked on of my rapidograph screw on caps in 91 percent alcohol and it softened and distorted the cap so that it is unuseable.
Hi Edmund, I deeply apologize that your comments (from 3 weeks ago) went unnoticed until now when I got your most recent comment.
I am glad that you were able to find a PDF about the humidifier, I would actually LOVE a copy of it. My father recently purchased a lot of vintage clogged pens and a different type of vintage German rapidograph pens and there happened to be a humidifier in the mix. I’m completely unfamiliar with this tool so I’m eager to learn more about it.
I did quickly learn that the vintage pen caps and bodies (which look quite a bit different than the “newer” ones – mine are about 12 years old now – that are pictured in this demo) TOTALLY melted in 91% alcohol after only 10 or so minutes. In fact, a couple of the badly damaged German ones that I tested first thing even changed color? I have yet to have issues with my “newer” bodies and alcohol but I have never soaked any part in alcohol for longer than an hour and now, (hearing your experience) would certainly not even recommend that. I’m curious what generation and origin your own pen bodies are and how long you soaked them. This might be critical for other readers with the same pens.
I will add, I have seen little difference in the nibs themselves, regardless of age or origin – in that Koh-I-nor seems rather consistent. They’re tough little things and the alcohol doesn’t seem to bother them. 😊
Wow, thank you so much! I resuscitated two pens that I haven’t used in 18 years! I had given them what I thought was a thorough cleaning before storing them, but apparently not thorough enough. In case it helps anyone else, I used isopropyl alcohol as a solvent and one of those little syringes they sell with the baby Tylenol. Instead of sucking alcohol through the tip of the nib, I gently blew it in from the supply side. The Tylenol syringe had a tip thin and long enough to get down in the barrel.
Oh, and I bent one of my wires too – fumbled the agitator and it hit the counter top. I got it mostly straightened and back in though!
Reblogged this on Atomicpixels's Blog and commented:
https://www.google.com/search?q=patience+persistence&safe=off&client=safari&hl=en&source=lnms&tbm=isch&sa=X&ved=0CAgQ_AUoAWoVChMIqu_5y-ixyAIVxFcaCh3gWwtz&biw=1024&bih=672#safe=off&hl=en&tbm=isch&q=patience+persistence+pen+ink
Thank you so much! In newly-minted graduate glee, I stashed my pens without cleaning them . . . more than 12 years ago. I’ve just assumed they were toast and have spent the interim time alternately burying them so I don’t have to acknowledge my shame, or looking at them and whimpering. And I’ve gone through countless sets of disposables, all of which I hate. I’m so happy to have some hope of cleaning them!
I just spent a lovely afternoon trying to rescue my 30 year old Rapidograph Pen. I appreciate your encouragement and instructions! The wire was broken (probably by me trying to get it out….very thick sludge) so I was not ultimately successful. I learned a lot, had a good time, and had time to contemplate the value I place on an object so long abandoned. Perhaps I too will find a deal on some stray pens, or just invest in a fresh one.
I enjoyed your blog as well, Megan. Your students are fortunate 🙂
Hey! So thanks for the tips on how to save them, you totally helped me salvage some of the finer ones out of a set I snagged for $10 (7 pens, complete with old ink even!)…. However, a question: The cleaning wire/needle – should it stick out/protrude beyond the the shaft/tip, once assembled? As in, some of the ones I cleaned, although they work fine, now have the wire sticking out a little before I press on my paper, and it sometimes leaves a little “hair” of a mark. Is that normal? Is it supposed to work something like a “valve” and open the flow of ink, or do they need repair?
Hope you can shed some light! Thanks!
There is a little bit of extension to the wire but not too much. The length of the wire from the metal barrel is fixed so it can’t be forced out more, however, if it’s too far out then your wire might have been pulled slightly? My pens are always a little scratchy when they get started but the flow of the ink smooths this out and the wire extension isn’t an issue. If it’s leaving a mark, you may be pressing too hard – something I find myself doing when the ink isn’t flowing as consistent as it should because of one reason or another (like air bubbles). Check out the photo here: http://www.draftingsuppliesdew.com/koh-i-noor-technical-pen-points – it shows about how far the wire should stick out.
Thank you! I’m moving and packing up my studio. I was so sad to find my superfine rapidograph all dried up… during breaks from boxing and sorting I switched out alcohol baths, q-tipped… all fixed! thanks so much for the excellent instructions! I probably should have worn gloves, but my hands usually have something colorful smudged on them, so I’m ok with that. 🙂
That’s great! And I have neglected gloves lots of times – it’s like the mark of the artist. Most people are so used to me being covered in something they don’t even notice anymore! 🙂 I hope your move went well.
Great instructions – thank you for putting them out. I ran across a set in my desk that has been sitting for almost 30 years. Almost all of them were put away full.
I would mention when disassembling the nib unit, one should never pull on the weight with the wire. Should it be stuck due to dry ink there is a good chance of breaking the wire. If it comes out on its own, great – otherwise I recommend soaking it in alcohol.
Also, soaking the parts in hot (to touch) water and gently agitating (swirling) will help loosen and dissolve some of the ink. My understanding is the drawing inks are waterproof due to the addition of shellac. Alcohol is the typical solvent for shellac, so anything the water doesn’t loosen/remove, the alcohol should work on.
Last mentions – a soft toothbrush is great for helping to gently scrub ink off, and out of the threads. I don’t have the cleaning squeeze bulb, so when cleaning the penpoint, I usually make sure it is full of water or alcohol when I insert the Q-tip. I find forcing the liquid through like this helps clean the tip.
Since I don’t need the ink to be waterproof, I have switched to using fountain pen inks in my technical pens. A great variety of available colours, and much easier cleanup as they only require water.
Great additions for consideration! I will caution that I’ve noticed that soaking in alcohol literally melts older plastics at times if soaked too long. I obtained some vintage pens and learned this the hard way. Fortunately this didn’t happen to the actual pen head components, rather it was just the housing parts.
Megan – absolutely phenomenal instructions! I recently found my old Rapidograph pens from my college days (they are about 21 years old). They were hopelessly clogged – no longer a problem after finding your tutorial. THANK YOU SO MUCH for the excellent write-up! Now to get back to some artistic pastimes 😀
So glad to hear that, Jeff – it’s great to know that such beautiful pens wasting away out there can find new life. Hope you create many wonderful things with them. 🙂
My 7-pen set hadn’t been used since art school, and I finished in ’95! I’m ashamed to say that there was black ink in four of my pens, and teal in another for nearly 23 years! I dug the set out of storage to send off to art school with our oldest son, but when I first looked them over, I thought it was a lost cause. However, thanks to a big bottle of rubbing alcohol and your wonderful instructions (found by a google search for cleaning koh-i-noor pens), they are all in beautiful working order once again! Thank you so much for sharing your techniques!
Awesome! I’m so happy that it helped and I hope that your son enjoys the “new” pens in their second life.
So glad it helped. 🙂 And thank you for the kind words of support and appreciation – it means a lot.
Thanks for posting this. Getting my pens out to start drawing again. I remember seeing your post a year or so ago, googled it just now and found it, it’s a great reference.
Awesome, I’m always glad that this keeps resurfacing over the years and that others are still finding it helpful. The last time I had a clogged pen I actually found myself going back though my own post to trouble shoot because I’d forgotten some of the tips so it’s still helping me. Sometimes you just never know what’s really going to be useful or not to document. 🙂
Hello there!
You Need Leads, Sales, Conversions, Traffic for crythebird.com ? Will Findet…
I WILL SEND 5 MILLION MESSAGES VIA WEBSITE CONTACT FORM
Don’t believe me? Since you’re reading this message then you’re living proof that contact form advertising works!
We can send your ad to people via their Website Contact Form.
IF YOU ARE INTERESTED, Contact us => lisaf2zw526@gmail.com
Regards,
Coolidge
Thank you for this simplified tutorial..I am trying it now w some Staedtler pens which are very similar that were my grandfathers which he gave to me probably 40 years ago..Most likely these pens are from the 30s and they have sat for 20 + years w dried ink in them. I’ve managed to get them about 80 percent cleaned now so wish me luck! No turning back now..Thanks Again!
Hello,
Thanks for this post, I’ve just cleaned a few of mine and had a question. I lost the pen cap (that goes on the back of the weighted cylinder with the needle) for my .35 when cleaning. I put it back together without and it works fine. I wanted to ask if there is any issue with using the pen without that part?
Great Article, so far I have recovered 1 of 4 pens that sat with ink in them since the late 1980s.
Thank you so much for taking the time to write this detailed guide. Nearly a decade later and who knows how many technical pens you have help save!
My story: I came across my 30 year old set in a box and was going to give them to my son as an “upgrade” to his Sakura Micras, but the high-school me clearly didn’t clean them out properly and the white bodies and caps had discolored with age as well as and I noted the cracks around the clamp ring from use. I looked at getting some new ones… and the are exactly the same after three decades. Couldn’t even find any “premium” versions of technical pens – just these or the rOtrings which appear to be practically identical in construction.
The research into options led me into the convoluted history of the licensing, branding, and original design of the modern technical fountain pen and I discovered the original German licensed Koh-i-noor 3060 design – looking and seemingly performing much more like my beloved plunger cartridge adapted fountain pens. Sixteen dollars and a few days later I have one from eBay in excellent external condition and with the original box, but upon initial disassembly of the plunger, it was clear that ink had been allowed to dry completely solid inside it. What to do?
That’s when I found this guide. I used the just 70% isopropyl I had on hand and using the plunger to initially flush the pen several times, let it sit for a couple of hours to soak, and everything loosened up enough I was able to remove the nib for some thorough cleaning throughout. A mitt full of inky cotton swabs later and it’s up and writing again.
The old German stamp pens are a much simpler design and made of materials that appear to be much more resilient than the modern counterpart – with a long-molecule odor I haven’t smelled in a very long time, but that appears to be no worse off for it’s age being much older than my original set! I was worried that the plunger seal would be in poor shape as I’ve had many cartridge converters fail over time, but this is simply not the case. I would love to see this simple, elegant design revived again, perhaps adapted for even more durable and premium materials for the case, cap and integral plunger, and made to accept the modern (or classic) style pen-point/weight/retainer cap set.
A quick tip for issues where the ink stops flowing: I do not recommend tapping the tip or shaking these or standard fountain pens at all as that can lead to blobs of ink in unwanted places as ink gets forced out the channel meant for the air to flow in. The better option is to hold the pen nib pointing UP and gently flick-tap the side of the pen to “burp” any air trapped between the ink reservoir and the nib and also coax any ink stuck in the helix down into the reservoir so the pen can breathe properly.
Thanks again for taking the time to write this guide – you have enabled me to give a very fine old pen a continued useful life!
This article is still helping! I just found several of my old pens that haven’t been cleaned for at least 2 decades. This article was exactly what I was looking for. I was able to disassemble them and get them cleaned. I haven’t added ink yet to see that they’re truly back to life but I wanted to thank you for the article.
Sweet! I’m so glad it helped you out – rescuing old pens is such a treat.
My pens are useless. They were sitting unused for about 15 years. I recently totally disassembled them, even using wire, soaked in alcohol and many Qtips, and many hours, to no avail. They did come pretty clean, but will not work. They’d are ready for the garbage. I have refused pen/ink commissions for a long time, but recently accepted one against my better judgement. I ended up buying two more pens. I
finished the commission and cleansed the new pens. I hope to never do another P/I again, not worth the aggravation. From now on I’ll stick to watercolors.
I’m so sorry your pens couldn’t be salvaged. I’ve had a couple of pens like that too, sometimes they’re just too far gone. I recently let my pens sit with ink in them and then bent the wire in one while cleaning it. Even the best efforts can fail. I hope that you won’t give up on your pen and ink work and that the new pens you bought serve you well.
Thank you for this! I saved a set of pens unused since 1998
except sadly the 0/3 which had the wire snap off in the tip during deconstruction
but 5 out of 6 ain’t bad!
I’m very glad that only 3 of the thrift store pens I found (a set of 7, for $5!) were used (the most-used one was certainly a piercing pain in the ass to clean!). This was really helpful.
(Sadly, I must note that one of the 3 was FUBAR– something happened to the nib as it was jammed way down in the pen body with the cleansing wire sticking out and bent. Still, 6 out of 7 ain’t bad!)