
In this 3 part series I’ll share with you what I did, what I learned, and what results I achieved. In the last installment, I’ll provide what happened with my attempts to use cabbage dye on unbleached 100% cotton muslin and 100% cotton canvas. I’ll show you how the dyes changed over the course of a week and also after washing in the machine and explain why some of these results might have occurred.
Check out previous posts that explore the initial dying process and materials as well as the results I achieved with cotton embroidery floss and cold-dying.
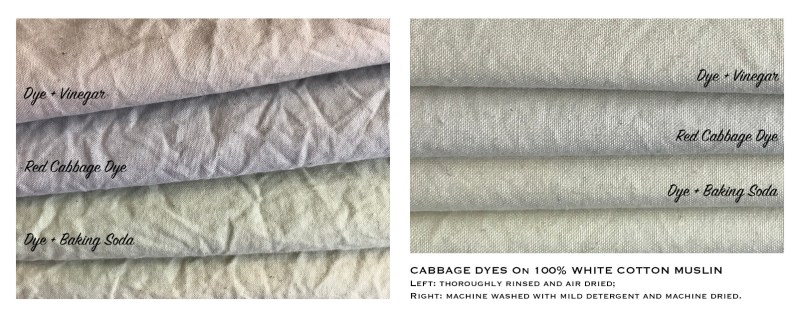
 The following fabrics were all dyed with cabbage dye that had been simmered for an hour per pH test level. The cotton fibers all were treated with alum prior to dying for an hour with heat applied. My initial results were positive for both the original neutral PH cabbage dye and the lowered PH dye obtained with baking soda, however, the fabrics that were dyed with added vinegar did not turn out as expected.
 No matter how much vinegar I added to the dye pot, the fabric stayed closer in color to the neutral pot color than the bright pink that I was able to obtain with the cold-dyes. I personally suspect that the alum used to mordant the fabric prior to dying altered the PH by counteracting the acidity of the vinegar as the pot appeared pink prior to immersion of my wet fabric. The longer the pots simmered the more the color shifted towards a base color result. I’m fairly confident that the PH has been lowered across the board because of this.
 I felt the need to wash all of my fabrics in the machine prior to use even though this is ill-advised for color retention with fugitive dyes. I used about 1/4 the normal amount of “All Free & Clear” laundry detergent in a small regular load with an extra rinse and dried on Medium. I ironed them afterward while they were still warm but sprayed “Downy Wrinkle Releaser” on them while ironing as their wrinkles were pretty tough to get out. Any one of these factors may have impacted the color results as the PH of the cabbage dye (always present in the fibers) can still be altered to a degree. After washing all results were even less saturated than before.
  As you’ll see, the color is verging on a cone-flower blue rather than the more fuchsia purple a more neutral pH would have created due to the alum (base) shifting the pH slightly as the fibers continued to simmer. Some areas seemed to approach this but, after running through the machine the whole piece was more neutralized.
 The neutralization of the vinegar is more apparent when you see the results of the neutral dye pot in comparison. The two swatches above were both in the original pot and they also exhibit some of the pinks. When all 4 fabrics were side by side it was easier to see the subtle shifts but overall it’s pretty hard to see any real change.
 The dye pot with the added baking soda was a much clearer shift, however. While I wasn’t able to get the dye pot itself to progress beyond teal, with the added alum (which appeared to introduce an additional base) the color changed to green after simmering for a while. I was so happy as green dyes are really hard to achieve with natural dyes contrary to what most would think since so much of nature is essentially green.
 In addition to the 10×12 inch canvas swatches, I also dyed larger 1/2 yard lengths of 100% unbleached cotton muslin fabric. Unbleached muslin is a really nice light beige to begin with so the colors are more muted even before they’re dyed. While I enjoy working with white embroidery floss with natural dyes, I really love working with unbleached fabrics because I feel that they help unify a wider spectrum of color that will need to act more as a backdrop for other work – either to support embroidery or paintings.
So, are cabbage dyes worth it? While I achieved some initially promising results I found that it took very little to either alter the color or to remove it from the fibers I was attempting to dye. The process was simple and easy to do in the kitchen and didn’t require anything the average household wouldn’t already have which makes this a great experiment for kids and as an introduction to natural dying. Despite the simplicity I wouldn’t recommend this for any projects which will be washed, worn, or exposed to the sun or elements in any way. As a result, this is not a process I’d undertake again for profession art use because it’s just not worth all the effort (and smell) when it is unsure how long I can anticipate preserving the outcome.

I think that using cabbage dyes would be most appropriate with kids because it introduces some really awesome ideas about the relationship between science and art: the science of ph (there are many articles online that help explain this in kid-friendly terms), creating art from natural sources, making the materials used to create art and the art of natural dyes, art lessons about saturation and light-fastness as well as the color spectrum and temperature, and of course – creating art with materials that are produced. It’s the best possible example of a STEAM project that I know of.
I’ve returned to more predictable and sustainable dyes now and am working on some new fabric pieces that will incorporate the dyed pieces I’ve been creating. I look forward to sharing this process soon.
