
After moving into our new home in June I threw my back out and shortly thereafter ended up having a much needed surgery. During my recovery I could not physically get to any of my still-boxed-up art supplies and could not sit or stand for more than an hour at a time. Bummer. Of course, this made me a little stir crazy – there is only so much “Netflix & Chill” a person can tolerate (no, really).
During my down time I saw a bunch of simple printing techniques on Pinterest and thought that attempting some basic kitchen prints with the kiddo when I was back on my feet. This would be a fun and quick way to give her some much needed mom love when I felt physically up to it. (I also needed a creative outlet so my brain would not atrophy.)
I used stuff laying around my kitchen and re-purposed what I could. As a result I had some egg cartons, lemons, and the butt of a stalk of celery. Not exactly the exciting array of stuff I saw online but it seemed good for what little I had planned. I picked up some cheap acrylic paints and fabric at Walmart. I was excited. In fits and starts I managed to pre-wash the fabric and tear it into pieces and when the time finally came I was pretty pumped.


Little girl didn’t quite get into it – she made one (as in a SINGLE) lemon print and then a galaxy around it with a tooth pick and ran off to play Lego’s again. I love her piece so I can’t exactly fault her “mic-drop” mentality – it just wasn’t her thing.
As a result, I was left to experiment with the remaining fabrics and paints by myself. I was glad in the end because I got into it more than expected and was happy to have the excess supplies on hand.


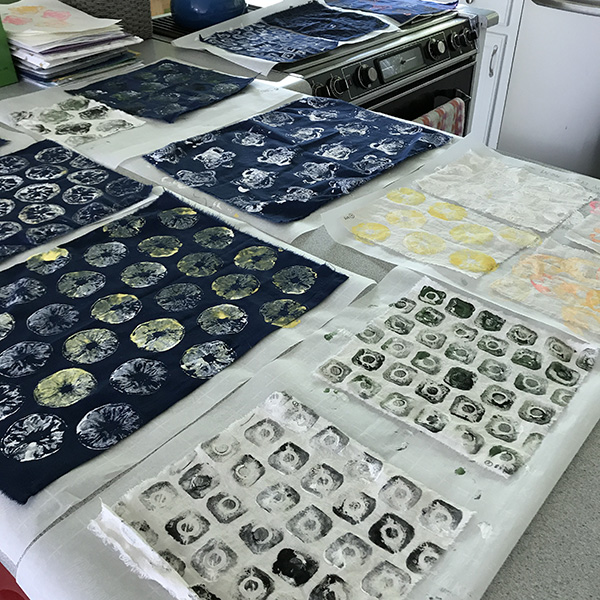
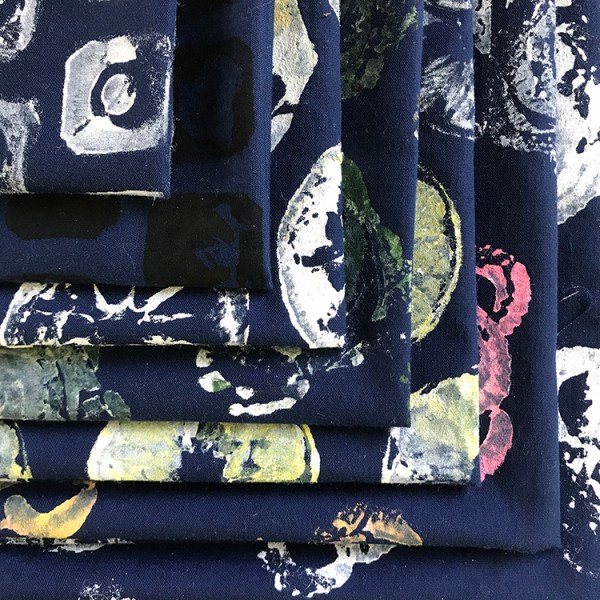
In all of the fiber art techniques that I have tried over the years I can honestly say I have never done these simple surface design prints. I enjoyed the process and playfulness of the celery and lemon prints and the bottom of the egg cartons really made a nice loose pattern. I quickly went through all the fabric I had available and my kitchen counters were covered by the time I went to lay back in bed on an ice pack and discuss the finer points of Lego vehicle construction with my girl.


The next day I was delighted more by the backs of these fabrics than the front (I think I might be a tad obsessed by the back of fabric). I have absolutely no idea what I will make with these but I did ensure that they were at least about the size of a 6” embroidery hoop. I think that it would be interesting to work with some of these hand-printed fabrics in my embroidery pieces but I am not sure how the stiffness of the paint will handle. We will see…

Post-Activity Thoughts:
- Create a place to hang fabrics to dry if you do not have a lot of counter space (or if it makes you crazy to have stuff on every available surface in your home for a few hours).
- Have wet-wipes or wet paper towels handy to clean up the “stamp” more easily or collect your stack of junk mail to use as blotters so that you can knock off any excess paint as well.
- Use old plastic bags or grocery bags wrapped over plates for paint palettes if you need quick clean-up.
- Save stuff other than veggies and fruit – consider your trash carefully! You could really make this project all about reusing and re-purposing if you got creative.
- Use a soft fabric paint or even a dye or stain if you’re planning on embroidering back into the fabric – the acrylic will likely put up a fight.

1 comment