
While preparing some materials for watercolor next week I ran across some earlier explorations with ink and gouache as a painting technique. The resulting effect is similar to a woodcut and the process feels very familiar to printmaking in general, which I have always favored. I remember really enjoying this technique in school and the students who I’ve had work with this concept in past have had really successful results.
I thought I’d share this technique today with some inspirational links to some other artists online who doing some cool hings with this painting approach.
Basic Required Materials:
- 140 lb watercolor paper, stretched or on a block
- waterproof ink (any color)
- white gouache paint (or other light colors)
- cotton ball or paper towel
Directions:
- Create a drawing of your image on your watercolor paper lightly with graphite. Be careful not to distress the surface of your paper too much.
- Use gouache to cover all areas that are to remain the color of the paper. Some people prefer to use a tinted gouache if working on white paper because it is more visible but be forewarned, some color stains so if you use a different color, use one that is really light and test it on the surface you are working on before using in an entire composition.
- Once the gouache is dry you should very gently coat the entire composition with a layer of solid ink. Light application is critical because harsher application with brush will pull up the gouache and you will see some bleed through (though this may be something you desire!).
- Allow the ink to dry thoroughly and then take the entire piece to the sink or tub (or large bowl/bucket filled with water) to wash-off the gouache. Because the gouache is water-based and the ink is not, the gouache will wash off and the ink will not – rub the cotton-ball or paper towel gently over the surface to pull up the gouache. If you do this too much then the surface of the paper may start to peel up or the ink may start to smear – be observant and you will know when to stop.
- When the gouache is washed away allow the piece to dry. If stretched or on a block, the paper should tighten up and relieve a lot of the buckling.
- You can repeat these steps several times – you are only limited by the paper you are using. Cheaper, lighter weight papers will start to deteriorate from the process faster than heavier better quality papers. Just remember that with each new layer – whatever you cover with gouache will stay (relatively) the same as whatever is covered.
- (optional) Work back into your image as desired but be considerate of how the original wash-off is integrated – embrace anomalies!
Tips and things to experiment with:
- Play with varied dilutions of your ink or experiment with colored (waterproof) inks.
- Try using some of the texture techniques from the Basic Techniques Portfolio in your ink.
- Other resists and techniques could add interesting effects too – try working with stencils or masking fluid for additional layering potential.
Examples of effects capable of being created:
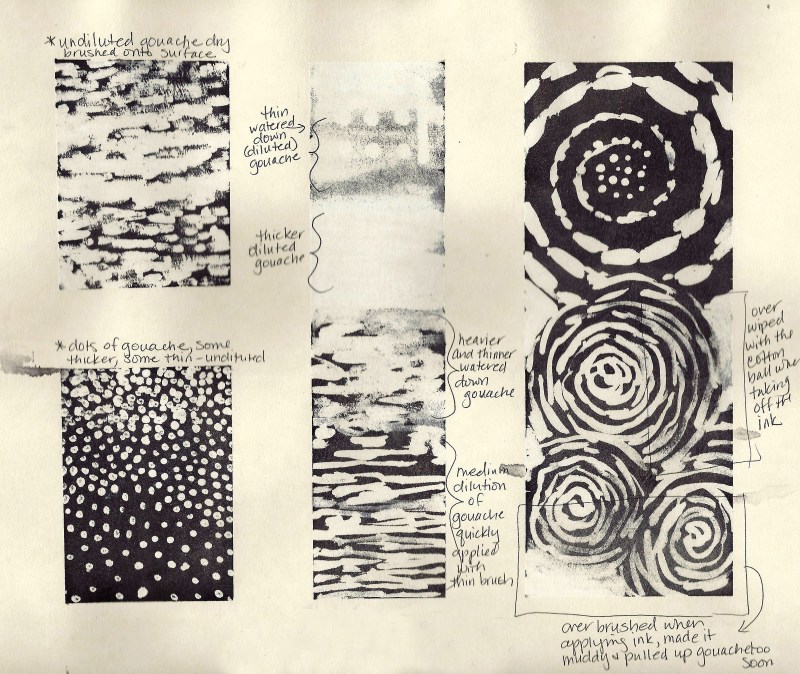
Some examples of potential results from this technique:


Here are some links to some great examples of this technique online:
- Lots of inspiration via Pinterest.
- Kit Bell’s handout on the technique is great – check out the work on her website as well while you’re at it.
- R H (Rhonda) Carpenter has a delightful little Goldfinch demo here.
- Joanie Spring offers a more colorful approach in her article for emptyeasel.com.
- Watch the magic of the wash-off reveal in this video on youtube.
